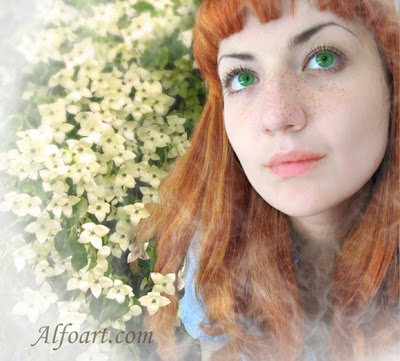
After editing:
Before:

Open background image and place your photo into a new layer.
In order to remove superfluous areas, choose Rectangular Marquee Tool  , create selection.
Go to Image > Crop.
Extract an object from its background.
Choose Filter > Extract.
Select the Edge Highlighter tool  , and draw to define the edge of the head. Drag so that the highlight slightly overlaps both the foreground object and its background. Use a large brush to cover wispy, intricate edges where the foreground blends into the background, as with hair.
Define the foreground area by doing the following:
If the object has a well-defined interior, select the Fill tool  . Click inside the object to fill its area
Choose Filter >Liquefy.
Modify a contour of hair, eyebrows and other using Forward Warp tool
Pushes pixels forward as you drag.
In order to increase hair volume, select the hair segment (use smooth selection), copy and paste it into a new layer.
____________________________________________________________
Transform hair segment using free transformation.
Merge two layers: portrait photo and hair segment.
Disguise sites of a joint of hair using Dodge tool and hair brush. Download them here.
Retouch interrupting sites of hair using Smudge tool 

In order to make hair bright and light do following:
- Click the Quick Mask mode button
 in the toolbox.
 - Choose soft round brush and fill hair area.
- Click the Quick Mask again.
- Choose Select > Inverse selection.

Fill selection with carroty light color.

Choose Soft Light Blending Mode and Opacity 49% for this layer.

________________________________________________________________
Duplicate the previous layer.
Go to Filter > Blur > Gaussian Blur (4-5).
Apply Dodge Color Blending Mode Opacity 11%.

Add shine to light sites of hair using Dodge Tool.

Choose Smudge Tool
 and small soft brush for it.
Extend eyelashes using this tool.

In order to make eyes bright and green do following:
Create smooth round selection fill it with color, which you want in a new layer.

_______________________________________________________________
Apply Overlay Blending mode and Opacity 60%

Duplicate the previous layer.
Choose Filter > Blur > Gaussian Blur (3,5)
Erase central part and apply Screen Blending Mode, Opacity 60%.

Click the Quick Mask mode button
 in the toolbox.
Choose soft round brush and fill face area.
Click the Quick Mask again.
Choose Select > Inverse selection.

Fill selection with light color.

Go to Filter > Blur > Gaussian Blur (3.5).

_______________________________________________________________
Create a face peppered with freckles.
- Choose carroty color. and small soft roun brush.
- Apply the following brush settings:
2. Scattering
3. Dual Brush
4. Wet Edges
5. Smoothing.


Create soft selection and fill it with freckles using created brush in a new layer.

_____________________________________________________________
Apply Color Burn and Opacity 42% to this layer.

Fill lips area with pink color using soft brush in a new layer.

Apply Soft Light Blending Mode to this layer.

Return to background layer.
Transform background layer using Perspective transformation.

Click the Quick Mask mode button
 in the toolbox.
Fill background area with black/white gradient.
Click the Quick Mask again.

Go to Filter > Blur > Gaussian Blur.

___________________________________________________________________
Go to Image >Adjustments > Photo Filter.
Apply Warming Filter.

Create a new layer.
Place it above hair layer.
Fill hair area with black color using soft brush.
Go to Filter > Texture > Grain.(100; 100; Soft).

Apply Screen Blending Mode.
Duplicate this layer. (Opacity 60-80%).

Add vector mask to face layer.
Erase sights of hair on several flowers areas.

Create a new layer.
Click "D' to default colors.
Go to Filter > Render > Clouds.
Go to Filter > Stylize > Glowing Edges (14; 15;17).
Erase face area using large soft brush.
Apply Screen Blending Mode and Opacity 74%.

Create round selection.
Go to Select Refine Edge, apply the following settings:

Select > Inverse selection.
And here is the result


by www.alfoart.com


4 comments:
very artistic...
i love working photos in photoshop but I dont have guts to work like what you have illustrated.. thanks for sharing...
nice blog...
visit mine:
www.yourlifelines.blogspot.com
Tutorial is very clear, thank you. Greets from photoshop masking.
Regards,
image masking
Supercool, very nice tutorial mate..!!
The next time I read a blog, I hope that it doesn't disappoint me as much as this one. I mean, I know it was my choice to read, but I actually thought you'd have something interesting to say. All I hear is a bunch of whining about something that you could fix if you we-rent too busy looking for attention. Photo shop
Post a Comment